
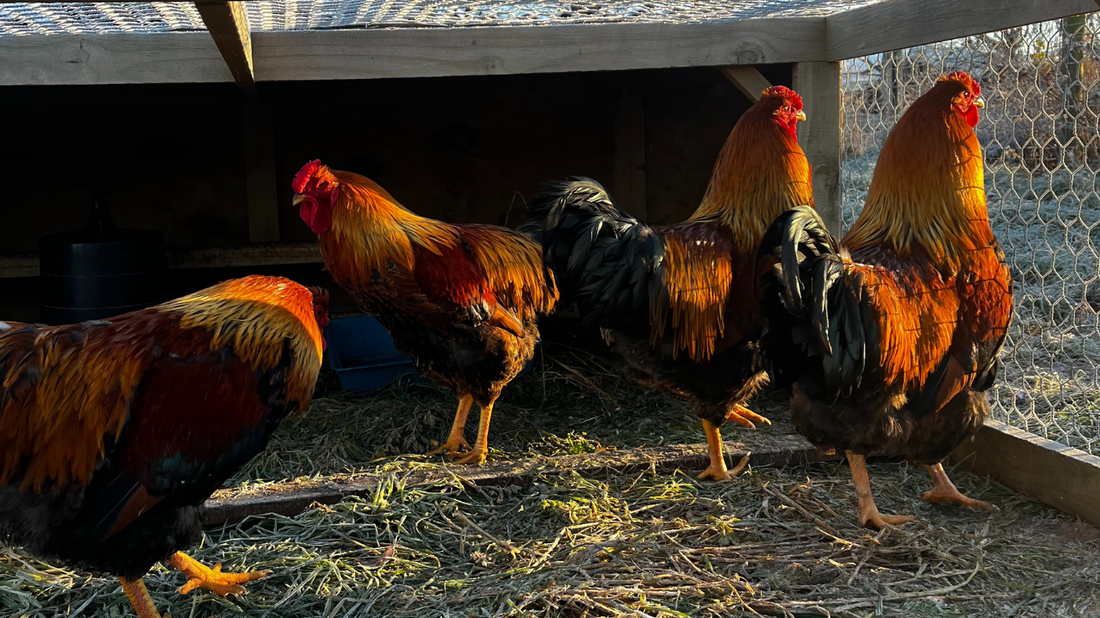
This past Sunday, we processed our Wyandotte roosters. At five months old, they’d grown out their frames, started to get a bit noisy, and were ready to head to the freezer. It was a satisfying way to close the loop on a project that began with a broody hen in summer and ended with homegrown meat in the middle of winter.
Why Raise Roosters for Meat?
Let’s rewind to where it all began.
Earlier this year, one of our hens went broody. Instead of breaking her broodiness, we decided to make the most of it and gave her a dozen fertile eggs to hatch. We sourced the eggs from TradeMe and opted for Wyandottes – a dual-purpose breed known for both solid egg-laying and good meat yield.
Dual Purpose vs Single Purpose Chickens
Dual purpose chickens are breeds that can be used for both eggs and meat. They take longer to mature than meat-specific breeds, but they’re ideal for small farms or lifestyle blocks because they serve more than one purpose.
In contrast, single purpose breeds are bred to excel at one thing. Our Brown Shavers are a great example: they lay prolifically but have small frames, making them unsuitable for the table.
Some well-known dual-purpose breeds include:
- Wyandottes
- Rhode Island Reds
- Sussex
- Plymouth Rock
- Orpington
Raising Wyandotte Chicks
Broody did all the hard work. Of the 12 eggs, seven chicks hatched – four roosters and three hens.
They started on chick starter crumble, then transitioned to a pullet grower mix at around 10 weeks. As they grew, we moved them into a chicken tractor, giving them space to roam while still being easy to manage.
At 15 weeks, the hens joined our laying flock. The roosters stayed in the tractor, which we shifted to fresh grass every couple of days. For their final month, we switched them to game bird crumble to help them bulk up.
We chose to keep the roosters separated to avoid disrupting the hen paddock and to control their movement, which can help keep the meat tender. Many people find rooster meat to be tough, but limited space and processing at the right age can make a big difference.
Processing Day: The Setup
On the day of processing, I removed their food and water in the morning and set up a butchering station in the afternoon. Here’s what we had on hand:
- Rope (to hang birds)
- Sharp knives & sharpener
- Buckets (for feathers and organs)
- Trays (for meat and giblets)
- Water for hand washing
- Towels
- Thermometer
- Two large pots of boiling water (to scald feathers)

Culling: Doing It Humanely
Culling should always be done calmly, respectfully, and as humanely as possible. If you're new to processing poultry, seek help from someone experienced first. Here's a basic rundown of how we did it:
- Hang the rooster upside down by the legs using rope on a fence post.
- Hold the head and use a very sharp knife to make a clean, deep slice under the jaw on both sides to sever the carotid arteries.
- Let the bird bleed out. A gentle tap on the eye (with no reaction) confirms death.
Plucking & Eviscerating
After culling:
- Scald the bird in 65°C water for about 30 seconds. This loosens the feathers for easy plucking.
- Pluck by hand or use a mechanical plucker.

Evisceration is next:
- Remove the head and carefully cut around the vent.
- Pull out all internal organs (being cautious around the gall bladder it is bright green and can taint the meat if knicked).
- Keep the heart, liver, and gizzard if you like.
- Rinse the bird thoroughly, inside and out.
- Remove feet by cutting just below the knee joint where the scales end.
Cooling, Packaging & Freezing
Because it was mid-winter and about 4°C outside, the birds cooled quickly post-processing. In warmer weather, use ice buckets or a chilled cooler to help the carcasses cool down safely.
We vacuum-sealed each bird, weighed them, and labelled the bags with the weight and date before popping them into the freezer.
Your FAQS
Do you raise Cobb meat birds?
No. Although they grow fast (ready in 6 weeks), they can be difficult to source in NZ and are known for health issues due to rapid growth. I prefer slower-growing, healthier birds for better quality meat.
Why didn’t you process the hens too?
Our hens are now laying in the main flock. We'll look at processing them when they're older and their laying declines.
Do roosters taste gamey?
They can, depending on breed, age, and how they’re processed and cooked. To reduce gamey flavour, you can:
- Rest the dressed carcass in the fridge (not freezer) for 24–48 hours before cooking.
- Cook low and slow to bring out a milder flavour and better texture.
How do you avoid chewy meat?
Same answer: low and slow cooking methods like braising or slow roasting work best for older birds or roosters.
What’s rooster meat like to eat?
It can vary, but if processed and cooked correctly, rooster meat is delicious, rich, and rewarding. It’s leaner and more flavourful than commercial chicken.
Do you hand pluck?
Yes for these four, we plucked by hand. We have a plucker, but it needs some TLC. If we do more than a few next time, we’ll get it back up and running!
How much did it cost to raise them?
- Eggs: $30
- Feed: $120
- That’s around $21.42 per bird.
Was it cost-effective?
Not really – similar cost to buying wholesale free-range chicken. But this was about making the most of what we had and producing our own meat. That’s a win in my book.
What tastes better – roosters or hens?
Honestly? Anything homegrown tastes better.
Final Thoughts
Raising and processing your own meat birds isn’t for everyone, but it’s a deeply rewarding part of small-scale farming. Our Wyandotte roosters gave us a sustainable, hands-on way to feed our family and taught us a lot along the way.
Got more questions? Pop them in the comments. happy to share what we’ve learned!